
Table of Contents
- What Are Natural Looking Nano Brows?
- Nano Brows vs Microblading: Understanding the Difference
- The Nano Brow Process: From Mapping to Final Result
- Nano Brows Healing Process and Timeline
Last Updated: August 16, 2026
What Are Natural Looking Nano Brows?
Natural looking nano brows are a form of cosmetic tattoo that creates hyper-realistic hair strokes on the eyebrow area using a manual handheld tool. Unlike traditional permanent makeup, which can look flat or overly uniform, nano brows mimic actual hair texture and depth by depositing pigment into the dermal layer with individual strokes that blend seamlessly with your existing brows.
The appeal is straightforward: defined, fuller-looking brows without the daily makeup routine. But there’s a critical distinction between "permanent makeup" and what actually looks natural. Many women have seen poorly done permanent brows that look painted on or too dark, that’s not what happens when the work is done by someone who understands brow mapping, skin tone, and pigment theory.
At GloVolution, the focus on natural-looking results means the artist considers your face shape, skin undertones, and existing brow hair before touching the skin. The goal isn’t to give you someone else’s brows, it’s to enhance and define what you already have with better symmetry and density where you need it.
Natural looking nano brows use a manual tool to create individual hair-like strokes that blend with your existing brows, delivered by an artist trained in brow mapping and pigment selection for your specific skin tone.
Nano Brows vs Microblading: Understanding the Difference
Both nano brows and microblading fall under the semi-permanent makeup category, but execution and results differ. Microblading uses a small handheld blade with multiple needles arranged in a row, making small cuts into the skin to deposit pigment. Nano brows use a single needle that punctures the skin repeatedly, allowing for finer, more precise strokes that appear more like actual hair.
Microblading strokes tend to be slightly thicker and can look more "drawn on" if the artist isn’t extremely skilled. Nano brows create thinner, more delicate lines for a truly hyper-realistic result.
Healing also differs. Microblading can cause more pronounced scabbing because of how the blade creates incisions. Nano brows tend to have a gentler healing phase with less visible scabbing, though both methods require careful aftercare.
| Technique | Tool Type | Stroke Appearance | Healing Timeline | Best For |
|---|---|---|---|---|
| Nano Brows | Single needle (manual or digital) | Ultra-fine, hair-like | 7-10 days | Natural, hyper-realistic look |
| Microblading | Multi-needle blade | Slightly thicker lines | 10-14 days | Bold definition, faster procedure |
If you’ve had microblading before and it looked too dark or artificial, that’s often a pigment selection issue, not a technique issue. The wrong pigment shade can make any method look unnatural. A consultation with an artist experienced in color theory is essential before your next procedure.
The Nano Brow Process: From Mapping to Final Result
The nano brow procedure starts with mapping, not the needle. A qualified artist will measure your face, assess your natural brow bone structure, and determine the ideal shape for your features. This is where the difference between a natural result and an overdone one gets decided.
Brow mapping identifies key points: where your brow should start (usually above the inner corner of your eye), where the arch should peak, and where it should taper at the tail. The artist uses these reference points to create a template, often drawing the proposed shape on your skin first so you can approve it before any permanent work happens.
Once you’ve agreed on the shape, the artist applies a topical anesthetic to numb the area. You’ll still feel pressure and vibration, but sharp pain is minimized. The actual nano brow procedure involves creating individual hair strokes that follow your natural brow hair direction and density, filling in sparse areas while leaving some of your natural hair visible. The entire process typically takes two to three hours.
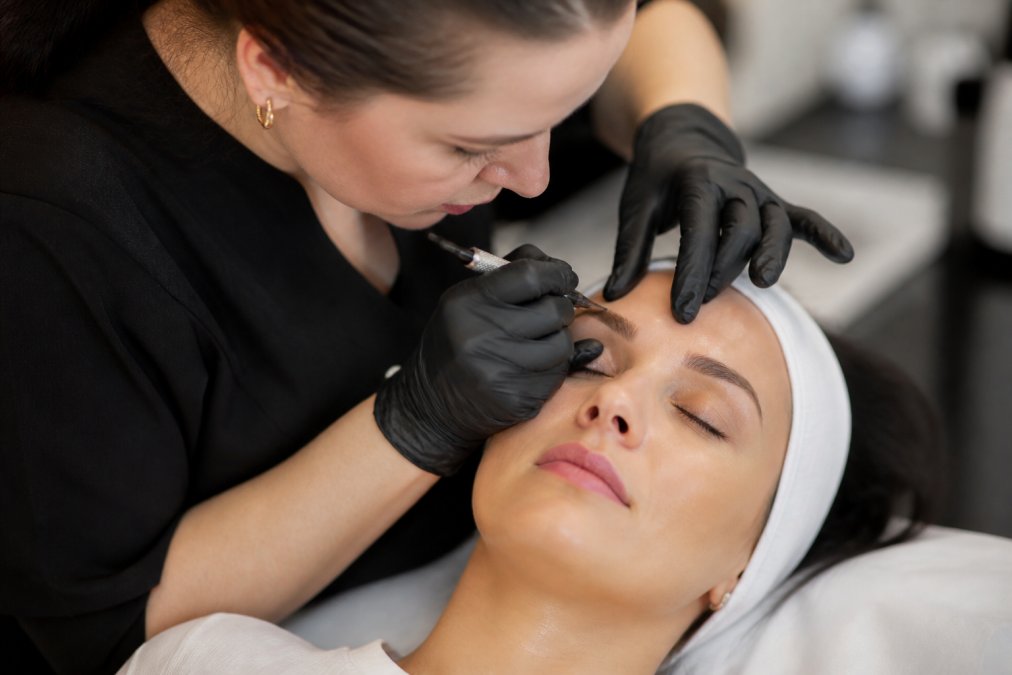
Ask your artist about their brow mapping process before booking. If they’re not spending 20-30 minutes on mapping and design, they’re rushing the most critical step. A rushed mapping phase is why so many people end up with brows that don’t match their face.
Nano Brows Healing Process and Timeline
Your nano brows won’t look finished when you leave the appointment. They’ll look darker and bolder than the final result because the pigment is still on the surface and hasn’t fully settled into the dermal layer. This is normal and temporary.
The healing phase typically unfolds over 7-10 days, though complete skin stabilization can take up to four weeks:
Days 1-3: Your brows will look quite dark and defined. There may be mild swelling and tenderness. Some oozing of lymph fluid is normal. Gently blot the area and apply the aftercare ointment your artist recommends.
Days 4-7: Scabbing begins, usually light and flaky rather than thick crusts. Do not pick at the scabs; let them shed naturally. Picking can remove pigment and create patchy results.
Days 8-10: Scabs should be mostly gone. Your brows will look lighter as the surface layer of skin sheds. This is when many women panic, thinking the pigment didn’t take. It did, you’re just seeing the final result emerge.
Weeks 2-4: The pigment continues to oxidize and settle. The color may shift slightly, usually becoming softer or cooler-toned depending on your skin’s chemistry.
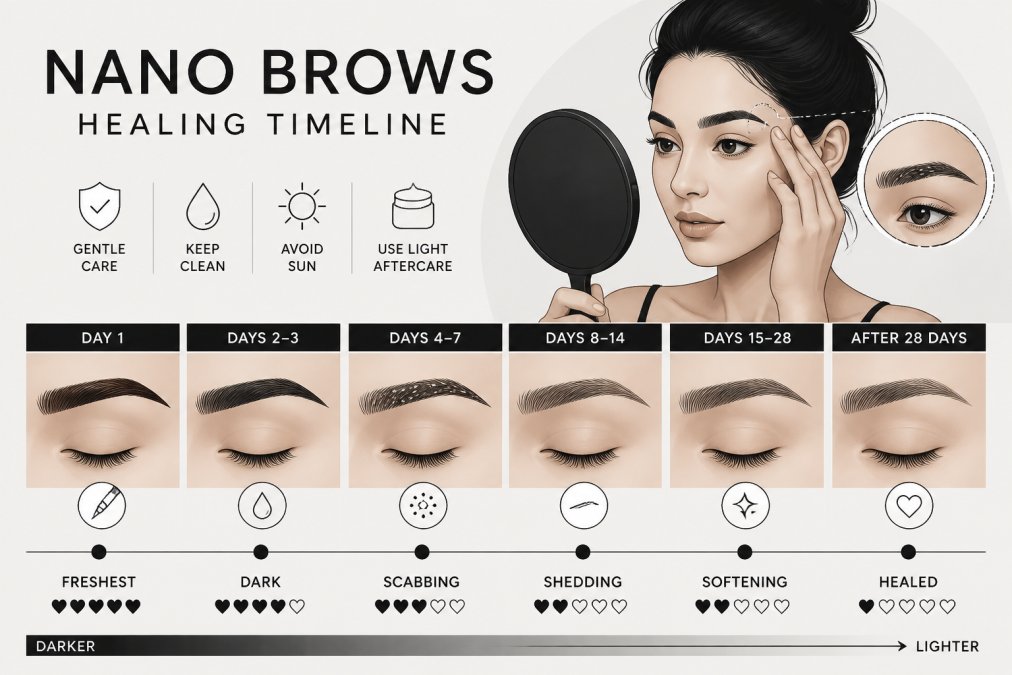
Aftercare is where most people either succeed or create problems. Keep the area clean, apply recommended ointment, avoid water on the brows for the first week, skip sweaty workouts, and stay out of direct sunlight. Follow your artist’s specific aftercare instructions exactly. The difference between perfect brows at week four and patchy results often comes down to aftercare compliance.
Natural looking nano brows can restore definition and confidence, especially for women navigating hormonal changes or simply wanting fuller brows without daily makeup. The technique works best when paired with an artist who understands brow mapping, pigment theory, and your specific skin type. At GloVolution, the approach combines clinical precision with artistic skill, focusing on results that enhance your natural features rather than replace them. Book an appointment to discuss whether nano brows align with your goals and to see how the process works for your unique skin and face structure.
Frequently Asked Questions
Can nano brows look natural?
Yes. Natural looking nano brows replicate individual hair strokes using a manual tool and precise pigment placement. The key is working with an artist who understands brow mapping, color theory, and your specific skin type. Oily skin and dry skin require different pigment formulations and application techniques. The result depends heavily on the artist's skill, look for someone with a portfolio of hyper-realistic work and client testimonials about natural appearance.
How do nano brows differ from traditional microblading?
Nano brows use a manual tool with a single needle to create finer, more precise hair strokes, while microblading uses a multi-blade hand tool that creates slightly thicker lines. Nano brows typically offer better pigment retention on oily skin and produce more refined, hyper-realistic results. The procedure is gentler on the dermal layer, and healing is often faster. However, both are forms of semi-permanent cosmetic tattoo that require touch-up sessions to maintain definition.
What's the healing timeline for nano brows?
Healing typically spans 7-14 days. Days 1-3 involve slight redness and tenderness. By days 4-7, you'll notice scabbing as the skin heals, this is normal. Days 7-14, scabs shed and color settles into the dermal layer. Full pigment retention stabilizes after 4-6 weeks. During the healing phase, avoid water, sweat, and picking at scabs. Many artists recommend a touch-up session 4-6 weeks after the initial procedure to refine shape and deepen color where needed.
Who should not get nano brows?
Nano brows aren't ideal if you're pregnant, nursing, taking blood thinners, or have active skin conditions like severe acne or eczema on the brow area. People with a history of keloid scarring should consult a professional first. Those with very oily skin may experience faster pigment fading and should discuss realistic expectations. If you've had a previous permanent makeup procedure that didn't heal well, address that with a qualified artist before proceeding.
How long do natural looking nano brows last?
Natural looking nano brows typically last 1-3 years depending on skin type, sun exposure, and aftercare. Oily skin tends to fade faster than dry skin because the dermal layer sheds more readily. Touch-up sessions every 12-18 months help maintain brow definition and color vibrancy. Consistent sun protection and proper aftercare ointment use extend longevity. Individual results vary, so discuss expected brow longevity with your artist during your consultation.
What aftercare mistakes should I avoid?
Don't get your brows wet for at least 7-10 days, this includes swimming, sweating heavily, and steam exposure. Avoid picking or scratching at scabs, as this disrupts pigment retention and can cause scarring. Don't use makeup or skincare products on the brow area during healing. Skip retinol, vitamin C serums, and acids for at least two weeks. Don't expose fresh nano brows to direct sun. Use only the aftercare ointment your artist recommends. These mistakes are common and can compromise the final result.
How do I know if an artist is qualified?
Look for certifications in paramedical tattoo artistry and specific training in nano brow techniques. Ask about their experience with different skin types, oily, dry, and mature skin require different approaches. Request a portfolio showing hyper-realistic work and consistent brow density across multiple clients. Read client testimonials about natural appearance and healing experience. A qualified artist will conduct a thorough consultation, discuss brow mapping with you, and be transparent about realistic outcomes based on your skin type and goals.
Will nano brows look overdone or fake?
Not if you work with an experienced artist. Natural looking nano brows should blend with your existing brow hair and enhance your natural brow shape. The artist should use color matching based on your skin undertone and hair color, not a one-size-fits-all pigment. Proper brow mapping ensures symmetry and proportion to your face. Avoid artists who push heavy pigment or dramatic shapes. During your consultation, show examples of natural brows you like and discuss your concerns about appearance, a confident artist will address them directly.
This article was written using GrandRanker